Take about sixteen photographs:
This slideshow requires JavaScript.
…that illustrate the following colour relationships:
1: Colour Harmony through Complementary Colours
-

-
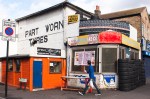
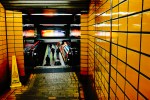
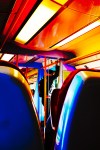
fig 1: orange & blue – glasgow
-

-
fig 1a: movement
-

-
fig 1b: accentuated colour
I spotted the building while I was walking from the subway on my way to a meeting at Pacific Quay. On my way back, I had enough time to loiter, waiting for people to walk by in both directions. The pale orange of the brick is matched by the reddish orange of the trim to the gable and the door and contrasts nicely with the pale autumn blue of the sky to the north; I like the tiny bits of colour reflected in the gutter. A very flat image (with flat lighting – it was taken at noon) with a lot of horizontal lines running through it: the kerb, the line in the middle of the road and the bottom of the building wall; the diagonals of the gable add interest. The eye moves between the two points made by the door and the walking man (who is surprisingly close to the wall, if you look closely).
-

-
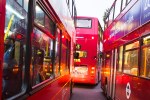
fig 2: orange & blue (+ red + green) – london
-
-
fig 2a: movement
-

-
fig 2b: accentuated colour
The orange and blue of the sign stands out strongly here and there’s lots more of both colours in the traffic and the pedestrians who occupy the space round it. Your eye moves then to the green and red barriers that enlose the sign, making an inverted vanishing point in the centre bottom of the image, with the red also turning up as highlights in the fragments of distant buses on the road and reflected in the plate glass of the window on the right.
-
-
fig 3: orange & blue (+ yellow + violet) – london
-
-
fig 3a: movement + structure
-

-
fig 3b: accentuated colour
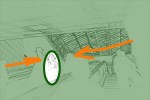
An astonishing corner on the Lea Bridge Road, composed as four quadrilaterals united by the sense of movement provided by the striding man in the jersey that managed to be a gloriously matching blue to the door. There’s a minor violet and yellow thing going on in the upper right quarter as well. There is an interesting absence of any scale to the various bits of the building too.
-
-
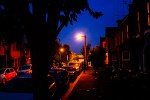
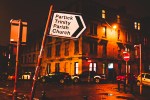
fig 4: orange and blue – london
-

-
fig 4a: structure
-
-
fig 4b: accentuated colour
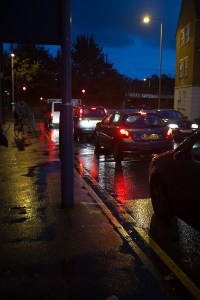
Essentially a diagonal band of orange, a diagonal band of blue and a second diagonal band of orange, with your eye drawn to super-bright highlight of the central streetlight, which is casting all the yellowy-orange glare in the street. I’ve been walking on my way home from the tube at dusk a lot these past few weeks, and this is probably the best representation of it that I’ve managed to take.
2: Colour Harmony through Similar Colours
-

-
fig 5: yellow + orange – glasgow
-

-
fig 5a: compostion and movement
-
-
fig 5b: accentuated colour
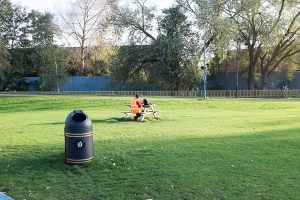
Lots of lines pointing in towards a vanishing point on the platform, held together by the overall warmth of the colours in the station. The lightness of the yellow contrasts to the dark orange-brown of the tiles where the stair dips down to the platform while the brigthness of the orange (sort of) cross formed by the sign, its reflections and the train give a focus and depth to the picture.
-

-
fig 6: red & violet – london
-

-
fig 6a: compostion and movement
-

-
fig 6b: accentuated colour
Reflections after rain stop this being boring, while a walking man (central and pulling the attention in from the edges of the frame) gives the composition focus and a point of balance. The violets in the this are very cold somehow, with the reds providing no sense of warmth.
-
-
fig 7: red & yellow (+ violet) – london
-

-
fig 7a: movement
-

-
ig 7b: accentuated colour
Despite the sense of forward movement into the space between the nearer two buses here nothing was moving (possibly a faster shutter speed might have spoiled this while sorting out the slight sense of softness across the image) and I was safely stood on a crossing in the middle of Walthamstow Bus Station. Again, there is something quite cold about the image, despite the warmth of the colours.
-

-
fig 8: yellow & red – glasgow
-

-
fig 8a composition and movement
-
-
ig 8b: accentuated colour
More streetlight, mostly a rather bilious yellow provides an out-of-focus backdrop for the leaning sign. Despite the possible depth off to the left and the right, a rather flat image.
3: Colour Contrast through Contrasting Colours
-

-
fig 9: red & blue – london
-
-
fig 9a: compositon
-
-
fig 9b: accentuated colour
Red and blue fighting one another with the orange relating to both (opposite to blue and comfortably similar to red) and so making it less uncomfortable somehow. compositionally arranged around the triangle betwen the seats occupied by the man and his rucksack.
-

-
fig 10: yellow & blue – london
-
-
fig 10a: composition and movement
-

-
fig 10b: accentuated colour
A striking yellow gable end with the shadow of a perpendicular row of houses cast on it by the late afternoon sun. The blue of the eastern sky contrasts with the yellow strongly.
-

-
fig 11: yellow & blue – london
-
-
fig 11a: compositon
-

-
fig 11b: accentuated colour
Nice shapes at the entrance to work. For some reason on the day I took it, I was able to notice the strong contrast between the yellow of the artificial light inside and blue light coming in from the windows to the west. Compositionally a mass of quadrilaterals, capable of further abstraction.
-

-
fig 12: red & blue – london
-
-
fig 12a: composition and movement
-
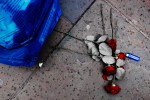
-
fig 12b: accentuated colour
An objet trouve. A strong colour contrast between the red of the flowers and the blue of the rubbish sack and the lighter emphasises the softness of the abandoned roses and the hardness of the plastic; the light green of the leaves’ underside contrasts with the red of the flowers while stopping the blue jarring as much as it might. The lines between paving slabs and the stems of the roses adds a sense of movement through the frame.
4: Colour Accent using any of the above
-

-
fig 13: orange accent – london
-
-
fig 13a: composition and movement
-

-
fig 13b: accentuated colour
A very centralised composition with the cyclist frozen within a a central diamond formed by the cars’ slanting windscreens, the roofs and the tree. An obvious orange point amongst the blues and greens of the foliage and the sky’s reflections on the shiny surfaces of the cars.
-
-
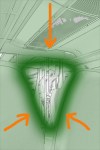
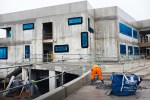
fig 14: orange accent – london
-

-
fig 14a: composition and movement
-

-
fig 14b: accentuated colour
Taken through a 1 inch square mesh, covering a window on the hoarding that surrounds this building site, hence the vignetting at the bottom of the image. I got the lens in a better place for this with a second shot, but the man’s legs were no longer in a perfect inverted ‘V’… The picture is further held together by two triangles (or one quadrilateral) formed by the man and the two orange-red bands above him on the building and the orange net at the bottom left.
-
-
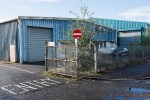
fig 15: red highlight – glasgow
-

-
fig 15a: composition and accent
-

-
fig 15b: accentuated colour
If William Eggleston can do pictures with their composition based on the confederate flag, I can take a picture composed like a saltire. Particularly when I’m in Glasgow. The greenish-blue of the building, the sky and its reflection in the puddles along with the green of the leaves contrast strongly with the red of the no entry sign.
-

-
fig 16: red highlight – london
-
-
fig 16a: compositon and eyelines
-

-
fig 16b: accentuated colour
The sight-lines of the woman at the bottom left and the man taking up the whole of the right side of the frame all point in towards the woman in the red coat, with the colour hopefully stopping the tall man in the hat being the sole focus of the picture.
All pictures taken with a Fujifilm X-100s apart from Fig 3 which was taken with my Nikon D50 and a Nikkor 24mm 1:28 lens. All editing on the main images done in Adobe Lightroom 5.
More general thoughts on these pictures and how they relate to my reading will be contained in the next post.