“For this assignment you will draw together the different lighting techniques you have been studying and apply them to one object. The idea is to use your new knowledge of lighting to bring out particular physical properties of the same object. It is also a test of your observation. Choose any subject that you can move around and take 8 photos based on the 4 themes of the assignment. At the core of this assignment you should aim to show the following qualities (Shape, Form, Texture & Colour) of your subject, one at a time, by means of the lighting.” – AoP Coursebook
All pictures were taken using a Nikon D50 with the ISO set to 200.
1: Shape – This quality has to do with the outline of an object – its edges. These are likely to stand out more clearly if they contrast with the background, and if there is minimum detail visible in the object.
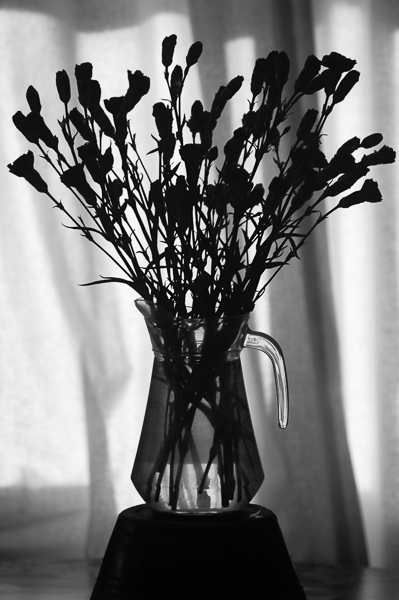
Fig 1 – Shape – Available Light
i – Late afternoon sunlight from behind, diffused by curtains; no fill. Long focal length (112mm/168mm 35mm equivalent) to flatten image somewhat, with camera approximately 4 metres from subject and the flowers 1.5 metres from the background; wide aperture was used to help separate subject from background by reducing the depth of field. Colour original very yellow due to low angle of sun and the oatmeal material of the curtains – when it was converted to B&W, I increased red/orange/yellow in the mix while reducing blue/green in order to lighten background while further darkening the silhouetted jug of carnations.

Fig 2: Shape – Photographic Light
ii – Bright Field Lighting (Hunter, Biver, Fuqua – Light, Science and Magic – Chapter 7) using a light box, fairly close to the rear of the subject; no fill. I used the zoom lens to keep edges of the light box at the edges of theframe in order to achieve the black outline of the jug and it’s handle through the creation of internal reflections. The image was then cropped so the subject filled the frame. With the camera positioned close to the lens’ minimum focus distance, sufficient depth of field to keep the whole bunch of flowers sharp was achieved with a small aperture (f16) and a relatively long exposure of 1/15″ to correctly expose using the relatively weak artificial light source. I did not convert this to B&W as I rather like the almost pen-and-ink-on-parchment feel of it, and the slight hint of magenta flowers coming through.
2: Form – This is another way of describing the volume of an object – how 3 dimensional it looks. The modelling effect of the light and the way you deal with the shadows is all important. Try to show as much depth as possible in the subject.

Fig 3: Form – Available Light
iii – Late afternoon sunlight (about 40 minutes after fig 1) through window on the left of the frame. This contrasty low angled side light was softened slightly by sticking a sheet of grease-proof paper onto the window, but no attempt was made to reflect light back from the right to soften the shadows, emphasizing the 3-dimensional nature of the subject. The low sunlight did not directly strike the background, resulting in it being underexposed and so, I hope, further separating the lit subject from the background, again adding emphasis to its form. Depth of focus was boosted by setting the aperture to f9 and by using a shorter focal length than the more flattened picture in Figure 1. This picture was one of ones taken earlier during the exercise, so the flowers are less open, leading to them having less form to define.
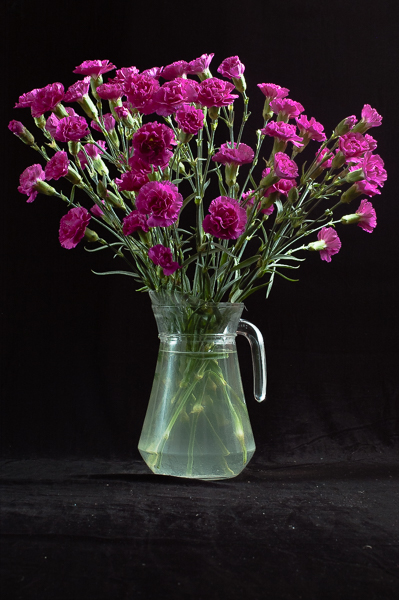
Fig 4: Form – Photographic Light
vi – The subject was placed on a strip of black velvet which was then taped to the wall about a metre behind the jug and flowers. The key light was a Nikon SB-27 Speedlight firing through a white umbrella above and to right of the subject; a silver reflector was then positioned to the left to create the shape-defining band of reflection in the glass jug and also to stop the unlit side of the subject vanishing into the black of the background. Again, the aperture of the lens (a 35mm prime) was shut down to f11 to keep as much of the subject in focus as possible, but this time, due to the brief duration of the strong light from the flash, the shutter speed was able to be a fast 1/400″ rather than the 1/15″ used in fig. 3.
3: Texture – This is a quality of the surface detail. Fine detail, such as that on sandstone or skin, stands out best with a pattern of small, hard shadows, so you will have to consider both the diffusion (or lack of it) and the angle of the light. Of course, a shiny surface like chrome, although it is thought of as being smooth, also has a texture of a kind.
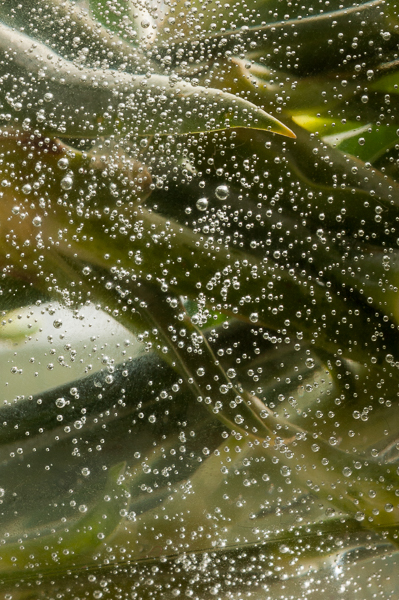
Fig 5: Texture – available light
v – Undiffused late afternoon sun shining through the jug, creating reflection on the surface of bubbles in the water which had collected on the inside of the jug the flowers were standing in. The lens used was a Micro Nikkor 55mm 1:3.5 prime macro lens shut down to f16 with an exposure of 1/8″. The picture has been rotated 90 degrees from landscape to portrait to match the others in the assignment.

Fig 6: Texture – Improvised Light
vi – Improvised using a Mini Maglite pen torch with the beam focussed on the carnation to the left of frame and a kitchen foil reflector to the right to reduce contrast in image. 55mm micro nikkor 1:3.5, f16, 2″. The length of exposure – intended to compensate for the low light output of the maglite and the small aperture used to create enough depth of field for the picture to be about the texture – inadvertently smoothed out the effect of my hand trembling as I held the foil reflector in position giving a more softened edge to the reflected fill.
4: Colour – Choose a kind of lighting and exposure setting that shows the subject’s colour (or colours) as strongly as possible. In addition, you could photograph your subject in any other interesting, unusual or attractive lighting.

Fig 7: Colour – Photographic Light
vii – Nikon Speedlight through umbrella to rear and above subject. Lens was a Nikor AF-D 35mm 1:2 at f4; exposure of 1/500″ to restrict the light to that provided by the strobe. The pale blue of a background (a bed-sheet) was chosen to sit in the spectrum between the magenta of the flowerheads and the green of the stems; the magenta was further highlighted by slightly underexposing the image as covered in part 3 of the course. White balance was set to Flash in the camera and did not require any correction later.

Fig 8: Colour – mixed light
viii – Mixed light from a Nikon Speedlight with a cheap, “gold” (nearly tungsten, but not quite) Flash Bounce Diffuser restricted by long black-wrap snoot to only illuminate the flower heads acting as the key; fill provided by very early morning daylight on a cloudy day through west facing window in shot to left of camera. Lens was a Nikor AF-D 35mm 1:2 at f6.3 with an exposure of 1/3″ to allow the blue fill to burn in after the initial brief punch of coloured light from the flash. The camera’s white balance set to tungsten, but adjusted slightly in Lightroom to give a less blue cast to the entire picture as the original effect was overly lurid, resembling 1930’s technicolour a bit more than I wished.

You have produced an interesting variety of images for the assignment . I especially like 5 & 6 . I remember doing this assignment well using a teddy bear & car inspection lamp !
Pingback: Assignment 4 – further reading; stems, weeds and studies | Simon Chirgwin's Learning (B)Log
Pingback: Assignment # 4 – Tutor’s Comments | Simon Chirgwin's Learning (B)Log