Keep the camera in a fixed position (on a tripod) aimed horizontally at the subject. If you are using an object (rather than someone’s face) place it on a small level surface so that there is room to move the light all around it. Place a plain background some distance behind. Start with the light, fitted with its diffuser, at the same level as the subject and camera. Between shots, move it around the subject, so that you photograph this lit from the front (with the light next to the camera), from the side, from behind and to one side, and from directly behind. With the light directly behind, aimed forwards to the subject and camera, the effect you will have is that of a silhouette, provided that the area of the light’s diffuser is greater than that of the subject. Then raise the light so that it points down towards the subject at an angle of about 45 degrees. Again, move the light right around the subject between shots. Finally, suspend the light overhead, pointing down, and take three pictures: directly overhead, from slightly in front, and from slightly behind. Lay out all the photographs together.
Study the differences in order to become familiar with the effect of moving the light. You should find that certain qualities of the subject are revealed better by some lighting directions.
– AoP Coursebook
1: Light from same angle as camera:
-

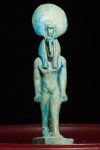
- fig. 1: Frontal
-

- fig. 2: Side
-

- fig. 3: Rear Quarter
-

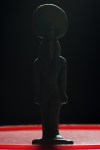
- fig. 4: Rear
Of this first set of four, I like them all, with the exception of the flat, frontal lighting in fig. 1. The hard silhouette with the light shining directly into the camera and the reflective surface of the bucket reflecting the light adding to the outline of the statue base (fig. 4) is a very satisfying effect, giving a strong idea of Thoth’s shape.
2: Light from above, at angle of 45°:
-
- fig. 5: Frontal
-
- fig. 6: Side
-

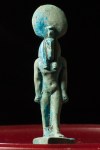
- fig. 7: Rear Quarter
-
- fig. 8: Rear
There is some shadow created by the higher angle of the light in fig.5 which reduces the flatness of the image compared to the first set. fig. 6 and 7 have the area illuminated extended further around the statue’s edge; in fig.7 the lit rim of the sun disc on Thoth’s head works particularly well. fig. 8 would be improved if there was either a flag or a lens hood to block the light spilling into the top of the frame, causing halation.
3: Light from directly overhead:
-

- fig. 9: Front
-

- fig. 10: Overhead
-

- fig. 11: Rear
Here, fig. 9 & 10 both show a lot of shadow-defined relief; in fig. 10 this is a bit extreme; in fig. 9. the effect is better, probably giving the best 3-d depiction of the statue. Fig.11 again shows the need for a flag or a lens hood; the angle that the light hits the base of the red bucket no longer reflects back to the camera, leaving a flat coloured surface.
I assume that these effects can be combined to give – say – a half-lit figure with the other side outlined by combining the lighting in fig. 2 from the left of the frame, as here and fig. 7 with the light on the right side to the rear. There’s a lot to play with, and I’ll try to do so, going forward in further courses.
This was the second remake of this set (the original set was made in January 2015 and the first remake a couple of days before this set, in July, as part of my preparing TAoP for assessment). I had used an off-camera strobe diffused with an umbrella to light the object and found the amount of space required around it a limiting factor in how well I could position and reposition the light on its stand.
All the pictures were taken in my attic workroom. I used a zoom lens set at its longest focal length (300mm; 450mm equivalent on my Nikon D50) and set the camera about 2m back from the subject (a 3-4 inch tall, plaster statue of the Egyptian god of wisdom, Thoth) raised up to a good working height on a red overturned bucket. Lighting this time was provided by a single, diffused Neewer dimmable LED light mounted on a stand. I used it at full blast, but the amount of light produced was still much less than from the Nikon SB-24 I’d used on 1/8 or 1/4 power for the first two shoots. So very slow exposure times (varying between 1/8″ and 1/2″, triggering the camera with a remote to avoid shake) were needed to allow me to stop down the lens to the point where the whole subject was in focus. The exposure time varied according to the light’s direction, with the frontal settings being brightest (apart from the rear level light, shining directly into the camera) and the ones with the light from behind and to the side needing the longest exposure. The main surprise was how much space you need to light something, even with only one light.
