Photographing Movement 2 – Panning Camera With Subject At A Variety of Shutter Speeds

Nikon d50; 24mm lens; 1/15th sec
Having completed the static camera exercise with people on foot, I decided to try cyclists for the next one where I was to pan with the moving subject and observe the difference between different shutter speeds. I moved onto a wider lens (a nikkor 24mm 1:2.8 ais) to allow for the faster moving subjects to come into shot, be picked up by me and then followed as they passed through the centre of the shot.
It worked quite nicely, but I was out of the shade and in blazing sun and there weren’t enough passing cyclists. So I crossed the Lea to the tow path of the navigation, settled myself down on a bench and swapped lenses for an even wider Zenitar 16mm 1:2.8, giving a 35mm equivalent of 24mm, as the cyclists would be passing much more closely than before.
-

- 1: 1/10th sec
-
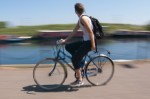
- 2: 1/15th sec
-

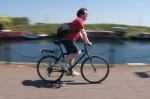
- 3: 1/25th sec
-

- 4: 1/40th sec
-
- 5: 1/30th sec
-

- 6: 1/60th sec
-

- 7: 1/100th sec
-

- 8: 1/250th sec
-

- 9: 1/1000th sec
(I know that 1/40th of a second (4) is faster than 1/30th (5), but pretending it isn’t preserves alternating directions of movement)
Once again, the strength of the light and the limitations of my camera’s ISO settings meant that much slower than 1/15th sec burnt out too much.
General Observations on the Exercise:
- Below 1/10th of a second, it is hard to track your camera with a quickly moving object
- Timing the start of the exposure is critical if you don’t want the subject to approach or depart at an oblique angle
- Approaching obliquely (3 & 4) is vastly preferable to departing obliquely (none, for that very reason)
- The distance between the camera and the moving object decreases as it approaches, reaches a minimum when the object is parallel to the film plane/sensor and then increases again. Therefore the moving object slows down as it nears the centre of the frame and the accelerates away. This means that the further away from the midpoint you open the shutter, the more the rear of the object will move at a different speed from its front. This gives interesting distortion effects (clearly seen in 4, where – I think – it enhances the sense of speed)
- The closer to the camera the subject passes the more exaggerated the effect of this.
- The closer to the camera the greater the relative sense of movement for static objects: the pictures here have three planes – the cyclist; the chain fence by the canal; the far side of the canal with the moored narrow boats – and the furthest loses its enhancing sense of movement first, then the railings, and finally the cyclist. At a 1/100th sec the background is still blurred and streaky; at 1/250th sec the chain is blurred by the background is coming to a halt; at 1/1000th sec all movement is frozen
- The rim of a wheel is travelling faster than the hub: the later pictures (1/100th onwards) show spoke detail at the centre of the wheels, but blurs at the rim. At 1/1000th everything is static
- If you manage to keep part of the moving object sharp (here, with cyclists, the face is key I think) the image is a good one (see 3, for a successful sense of movement with my pan remaining steady on the cyclist)
Different parts of the image all combine to create a sense of movement. Everything does not have to be blurred (and indeed something frozen is definitely required). The differing levels of blur are created by distance, relative speed and steadiness of pan. As with the previous exercise, some experimentation is probably required to establish the correct combination of these for the effect you want.
