Tag Archives: lea valley

the frame # 2 – object in different positions in the frame

oca-1.2-7
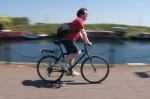
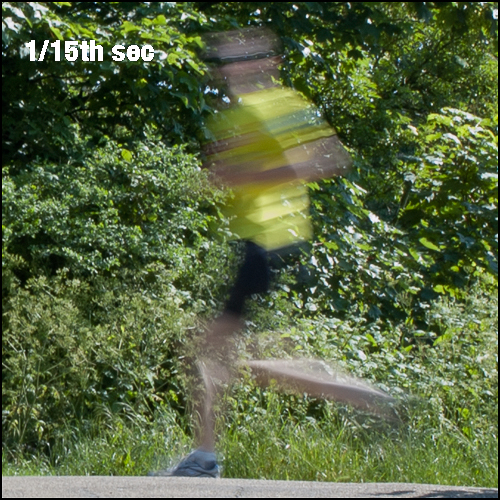
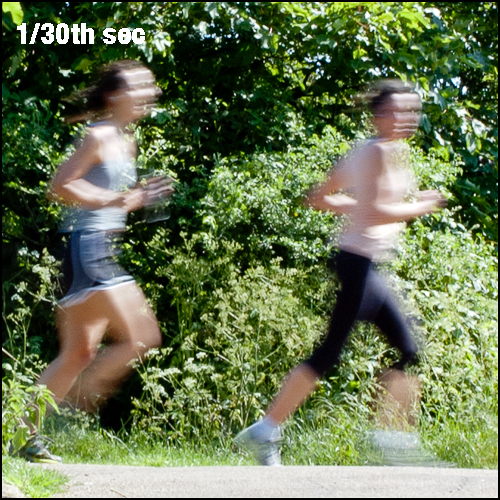
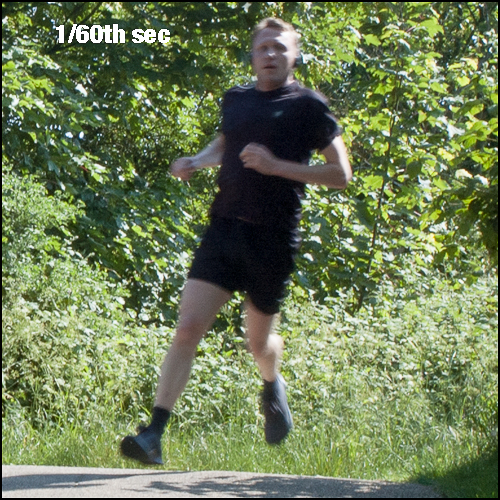
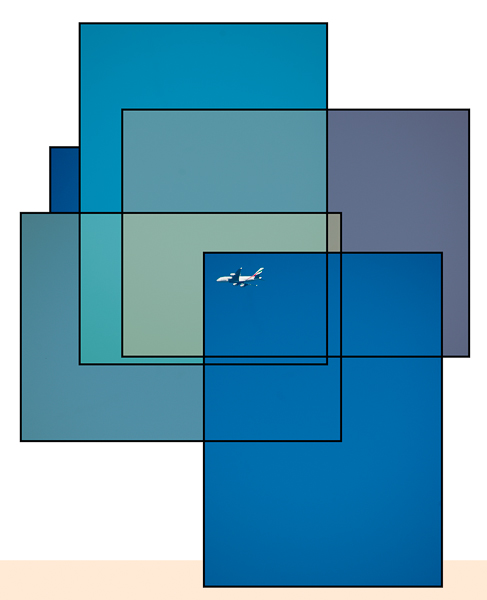
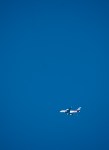
This is the exercise where you shoot a subject that is relatively small against a fairly flat background. As Walthamstow is under several flight-paths, it seemed a good idea to  try shooting aeroplanes against a cloudless blue sky. I did this on the same day as I took the ‘movement’ pictures‘ and made the horrible mistake of forgetting that for short exposures, I didn’t need to have the ISO set at its lowest and least sensitive (which was of course needed to be able to take long exposures in bright sunlight). Ah well!

I had with me my Nikon D50 and on it I had a Nikkor AF-G 70-300mm zoom. The intention was to use the zoom at its longest, giving the equivalent of a 450mm lens on a 35mm camera; this meant that I needed to set the shutter speed to at least 1/500th sec to avoid camera shake, leaving me with little option but to have the lens wide open at f5.6. And this, if you look up the lens’ performance on line, means that your pictures will be soft, as zoomed to the max, it needs to be at about f11 before it’s acceptably sharp. this is before you add in the effect of several thousand feet of hazy air. Of course, I could have upped the ISO to 800 and got f11, but I didn’t. Dolt! Idiot! Anyway…

…here’s the results (each individual photos rather than crops of a single picture), in order of (my) preference:

I think the reasons for my ordering them like that are:

  1. Comfortably in the air, with space to fly into…
  2. A sense of ascent somehow – the angle of the fuselage to the bottom of the frame; the space above?
  3. Descending…
  4. A bit meh, but okay – would – might? – work if tighter, and sharper…
  5. Better if nearer the top of the frame
  6. Uncomfortably close to the edge; on a different day (or a different subject) I might like this…

Most of these seem to be based on the sense of narrative given to the the picture, creating a sense of before and after the moment when he picture was taken. The impact is based on how off-balance the picture is, with the “extremely off balance” version (6) and the “equilibrium” versions (4 & 5) working less well that the off-balance-but-not-too-much ones.

Also, even at 1/500th second, it was fairly hard keeping the camera steady enough for focus – 1/1000 would have been better, so I tried tracking several aircraft before I latched onto this one and managed to get more than a couple of pictures with it in the frame where I wanted it before it decreased dramatically in size as it flew off towards Heathrow.

As a last technical note, it’s worth noting that the underside of an aeroplane will be several stops lower (f4 v f16) using “sunny sixteen” exposure calculation making it very hard to get detail on the bottom of the wings, if you can see the fuselage sides and top, particularly if the plane is painted white…

getting to know your camera # 5

Photographing Movement 2 – Panning Camera With Subject At A Variety of Shutter Speeds
speeding cylist in the lea valley park

Nikon d50; 24mm lens; 1/15th sec

Having completed the static camera exercise with people on foot, I decided to try cyclists for the next one where I was to pan with the moving subject and observe the difference between different shutter speeds. I moved onto a wider lens (a nikkor 24mm 1:2.8 ais) to allow for the faster moving subjects to come into shot, be picked up by me and then followed as they passed through the centre of the shot.

It worked quite nicely, but I was out of the shade and in blazing sun and there weren’t enough passing cyclists. So I crossed the Lea to the tow path of the navigation, settled myself down on a bench and swapped lenses for an even wider Zenitar 16mm 1:2.8, giving a 35mm equivalent of 24mm, as the cyclists would be passing much more closely than before.

(I know that 1/40th of a second (4) is faster than 1/30th (5), but pretending it isn’t preserves alternating directions of movement)

Once again, the strength of the light and the limitations of my camera’s ISO settings meant that much slower than 1/15th sec burnt out too much.

General Observations on the Exercise:
  • Below 1/10th of a second, it is hard to track your camera with a quickly moving object
  • Timing the start of the exposure is critical if you don’t want the subject to approach or depart at an oblique angle
  • Approaching obliquely (3 & 4)  is vastly preferable to departing obliquely (none, for that very reason)
  • The distance between the camera and the moving object decreases as it approaches, reaches a minimum when the object is parallel to the film plane/sensor and then increases again. Therefore the moving object slows down as it nears the centre of the frame and the accelerates away. This means that the further away from the midpoint you open the shutter, the more the rear of the object will move at a different speed from its front. This gives interesting distortion  effects (clearly seen in 4, where – I think – it enhances the sense of speed)
  • The closer to the camera the subject passes the more exaggerated the effect of this.
  • The closer to the camera the greater the relative sense of movement for static objects: the pictures here have three planes – the cyclist; the chain fence by the canal; the far side of the canal with the moored narrow boats – and the furthest loses its enhancing sense of movement first, then the railings, and finally the cyclist. At a 1/100th sec the background is still blurred and streaky; at 1/250th sec the chain is blurred by the background is coming to a halt; at 1/1000th sec all movement is frozen
  • The rim of a wheel is travelling faster than the hub: the later pictures (1/100th onwards) show spoke detail at the centre of the wheels, but blurs at the rim. At 1/1000th everything is static
  • If you manage to keep part of the moving object sharp (here, with cyclists, the face is key I think) the image is a good one (see 3, for a successful sense of movement with my pan remaining steady on the cyclist)

Different parts of the image all combine to create a sense of movement. Everything does not have to be blurred (and indeed something frozen is definitely required). The differing levels of blur are created by distance, relative speed and steadiness of pan. As with the previous exercise, some experimentation is probably required to establish the correct combination of these for the effect you want.

getting to know your camera # 4

Photographing Movement – Stationary Camera With A Variety of Shutter Speeds

man on a velocipede

Nikkor 1/1.8:50 AF-D; f22; 1/8th sec

Joggers, cyclists and dog walkers are found in abundance in the parkland that stretches down the Lea Valley from Tottenham Hale to the Lea Bridge Road. It seemed a good choice for the exercises featuring movement at varying shutter speeds. For the series taken with a fixed camera, I set up a Nikon D50 low on a tripod, pointing up the long stroke of a T-junction. The camera was triggered using an infrared remote. I used a 50mm lens, capable of stopping down to f22 as this would give me the widest possible range of slow speeds on what was a very bright day to be using a camera with a lowest ISO of 200. The resulting shots cover a range from 1/8th of a second to 1/400th of a second.

1/8th sec – runner
runner 1/8th sec

Nikkor 1/1.8:50 AF-D; f22; 1/8th sec

Almost melts into the air, leaving an elongated series of brushstroke-like traces as he goes. good for a highly abstracted sense of movement. His grounded foot remains stationary for the time the shutter is open (and will only begin to move as his trailing leg moves past it and the heel starts to rise) meaning that the Nike swoosh on his running shoe is the only fully identifiable part of him.

1/15th sec – runner
runner 1/15th sec

Nikkor 1/1.8:50 AF-D; f22; 1/15th sec

A more identifiably human presence – you can tell that a man in a yellow top and black shorts, wearing sunglasses has looked to his left as he passes the camera. He has been caught at a different point in his stride from the previous shot and his grounded foot has started to move although his trailing leg is less elongated. Against a more neutral background I think this would work nicely.

1/30th sec – Runners
runners - 1/30th sec

Nikkor 1/1.8:50 AF-D; f22; 1/30th sec

Neither figure is as pleasingly caught and blurred as in the previous shot, but the leading woman is the better of the two as she is further from the point where the two legs and arms cross the body rather than stretching out in front and behind. Gauging a shutter speed appropriate for the speed of movement is important, but so is timing relative to the stage of the action photographed.

1/60th sec – runner
runner 1/60th sec

Nikkor 1/1.8:50 AF-D; f22; 1/60th sec

He is crossing into the frame around the corner, rather than parallel to the plane of the sensor and so his relative movement is therefore less, and the effect is simply that he is out of focus. This creates a slightly troubling effect given that there are objects both behind him and between him and the camera that are firmly in focus. Given that his feet are both off the ground, this particular shot might have worked better with a much shorter exposure leaving him hanging frozen in mid air…

1/125th sec – walker
woman walking, 1/250th sec

Nikkor 1/1.8:50 AF-D; f22; 1/250th sec

She is moving more slowly than he is but like the runner above she is simply a bit soft within a sharp frame. Presumably she has covered a similar distance relative to the camera plane. The timing of the exposure relative to her movement is nice however – she is obviously mid stride.

1/250th sec – walker with dog
walking man and dog 1/250th sec

Nikkor 1/1.8:50 AF-D; f22; 1/250th sec

Pretty much frozen, apart from the dog’s front-left paw. Not bad.

1/400th sec – walker with dog
man and dog walking, 1/400th sec

Nikkor 1/1.8:50 AF-D; f22; 1/400th sec

Frozen, but not as nicely timed as the previous shot; the man’s okay but the dog’s legs are a bit of a mess in timing terms.

Conclusions

Different speeds of movement will require different exposure times to get the desired effect. Similarly, different directions of travel relative to the camera will effect the impression of movement. Timing the shot relative to the stage the subject’s movement has reached is also important. There is an area between extreme motion blur and frozen that is less successful than either extreme, for movement involving legs at any rate. In every new situation, you will probably need to experiment a bit before you determine where the sweet spots are, based on time, direction of movement and the desired effect. I suspect it would be good to revisit Muybridge’s work

The last 3 pictures feature a couple and their labrador who wondered what I was doing and then – after I explained – offered to do the last few passes, saving me some time waiting for someone to turn up naturally. Thank you, anonymous couple – I realise I should probably have got their names, and let them know somewhere where they would be able to see the pictures, like here!

sunday on the marshes

Walthamstow - Shutter Speed and Motion

Nikkor 35mm f2 AF-D; 1/60th; f22. ISO 200.

A good, productive morning, taking the pictures for the last two Getting To Know Your Camera Exercises (the movement ones) and also managing to get raw material for the first two of the Framing Exercises.

I headed down to the Lea Valley Marshes and spent the best part of an hour with my D50 on a tripod, focussed on a t-junction where there was likely to be a fairly steady stream of cyclist, joggers and people walking dogs, working through shutter speed and aperture combinations, and then crossed the river into Clapton, sat on a bench set a little back from the navigation’s tow path and panned with cyclists as they went past.

For the second framing exercise (Objects in Different Positions in the Frame) I took advantage of the numerous flight paths that cross the Lea Valley and the cloudless blue of the sky to take pictures of planes as they went overhead. Startlingly difficult, using a long lens (the full extent of my longest zoom is 300mm) to keep it all steady, shoot, reframe and not lose the (auto)focus. I think I have the pictures I need, but took way too many…

Then, on the way home, for the first of the framing exercises (Fitting the Frame to the Subject) I noticed a unit (?) a stockade (?) – it certainly isn’t a shop or a garage –  selling tyres, with a fair amount of signage outside, and decided to try a sequence of pictures of it, rather than go out again later and use a nice, orange and west-facing (so not lit yet) corner shop as the subject of the exercise.

I’ll write up each exercise separately, once I’ve edited the pictures for them…

So, a lot of ground broken, but plenty to do in terms of analysis and writing everything up. Two immediate thoughts on the days shooting: the first ties into the ethical question of whether its ok to take pictures of people in public spaces  the other regarding my rather tired digital camera. Both of them are covered in other posts, here and here

getting to know your camera # 1 – focal length and angle of view

A straightforward exercise and something I’m surprised I’ve never actually done before. For it I used my Nikon D50 body, Nikkor AF-D 35-70mm f2.8 zoom at both ends of its range and a Zenitar 16mm f2.8 to give a final, wider version of the view. I was interested to see that – when looking through the viewfinder with the other eye open – sizes didn’t match at a focal length of 35mm (the normal/50mm equivalent for my camera’s sensor) but did when the lens was zoomed in to about 50mm. While the angle of view was correct for the 35/50 equivalency, optically the perceived size was correct only with a tighter focal length. Presumably this means that my “sensor size” (the retina of my eye) is closer to the frame size of 35mm film and while it is seeing a narrower angle through the viewfinder (approximating to a 75mm lens on a film camera) the visible size of the objects seen remains the same. Certainly, a couple of days later, trying a 50mm lens on a film SLR, it was still the 50mm lens that gave the same perceived size in both eyes. Now, it would be worth trying this with a medium format SLR and a 50mm lens, just to check whether a 50mm lens – acting as a wide-angle this time – would show objects the same size in the viewfinder as they appear through the other eye in reality.

Anyway, here is a composite of the three shots I took, with the tighter angled pictures scaled down to the equivalent size in the widest and then pasted over the original with the frame’s edges outlined:

Image

When I returned with 3 A4 printouts, I was just able to get my hands far enough away from my face for the 70mm picture to match the size of the original, the 35mm picture was ‘right’ with a slightly obtuse angling of my elbows and the 16mm picture would have needed to be too close to my face for me to focus.

Of course, I forgot to take a tape measure with me, but – back home with a ruler and relying on muscle memory, or whatever it’s called – I was able to estimate the distance at which the prints matched up in size to the view as being 70cm for the tightest and 35cm for the middle one. The widest was impossible to gauge, but it seemed to be almost right when the paper was around 10cm from my face; from the other two, it presumably would have been about 16cm given that (for an A4 print) focal length in mm equals arm’s length in cm…